Sunday, November 8, 2009

Cytology Lab

Nadiah Bte Sukma
0705365e


Hi again...........
Very sorry for the late post...


Cytology laboratory has 2 different departments; Gynaecology and Non-Gynaecology department.


Non-Gynae deals with all kinds of liquid specimens that come from different part of the body, for example; knee aspirate, sputum, urine, FNA fluid from the breast, thyroid or parotid, and pleural fluid. Thus, as intern, i wasnt allow to handle these potential biohazardous materials except for my own urine, and sputum.


Gynae department receives Pap smear materials which come in 2 different method; as conventional slides and in ThinPrep vials.


As the term refers, conventional slides are slides that are already smeared with the materials/specimens and been spray-fixed to protect the cells from any damages by providing a waxy-cover. After properly received, the slides are to be place in 95% ethanol for around 10 mins to remove the coating so as to allow good penetration of dyes during staining. Then they are manually transferred to the automated staining machine for Papanicolaou stain.


Source: http://www.marketingvp.com/payback/cytyc/results.htm
Picture 1: Example of conventional Pap smear slides. The slides received are pre-smeared and spray-fixed.

Specimens that comes in vials (ThinPrep is the commercial name) are gynaecologic samples that are being collected by the clinician using sampling device which is then immersed and rinsed in the vial filled with PreservCyt solution (solution that acts as a preservative). Instead of being smeared on slide then send to cyto lab (conventional slide), the specimen is sent in solution form and so, it has to be prepared on slide first before staining.


Source: http://www.wcpl.com/physician_supplies.asp

Picture 2: Example of specimen vial that is received in cyto lab. The vial contains gynaecologic materials that have been immersed in the solution.

For specimens that are received in ThinPrep vials have to be prepared on slides before staining them to allow easy screening.
The vials are placed in ThinPrep 2000 processor that makes use of mechanical, pneumatic and fluidic principles for cell dispersion, collection and tranfer. This processor makes a relatively thin smear of the specimen materials that covers a specific area of the slides.

Source: httpwebsites.labx.comrankindetail.cfmautonumber=50949

Picture 3: ThinPrep 2000 processor.

The processor initiates a gentle dispersion of the PreserCyt solution that contains patient's material, this will break up blood, mucus, non-diagnostic debris and thoroughly mixes the cell sample. The cell are then collected on a TransCyt Filter specifically designed to collect diagnostic cells. The processor constantly monitors the rate of flow through the fliter during the collection process to control or determine the cellular presentation on the slides; from being too thick or scant. A thin layer of cells is then transferred to a glass slide in a 20mm-diameter circle and the slide is automatically deposited into a fixative solution of 95% alcohol.

ThinPrep processor mainly involves 3 principles.

1. Dispersion of cells; to separate debris and disperse mucus but gives no adverse effect on the cell appearance.

2. Cell collection; diagnostic cells are picked up (by a gentle vacuum) and collected onto the filter membrane.

3. Cell transfer; the collected cells on the membrane are transferred onto a glass slide by gently pressing them onto the surface of the slide. Natural attraction and slight positive air pressure cause the cells to adhere to the microscopic slides resulting in an even distribution of cell in as defined circular area.


Source: http://ssp-labs.com/cytology.html
Picture 4: ThinPrep slides with a defined circular area of cells; processed using the ThinPrep processor.

Histopathology Lab - Staining

Nadiah Bte Sukma

0705365E


Hi......

very sorry for the late post..


STAINING

In histopathology lab, all slides have to be stained using Haematoxylin & Eosin staining. Special stains request will be made after pathologists have seen the H&E slides and decided that the case needs further investigation with different stains eg PAS, GMS, RETIC.

The slides that ready for staining have to be initially air dried by placing on the sides of the hot plate until the wax shows signs of melting. this step is important because placing them directly on the hot plate will create a pool of water and melted wax (caused by sudden change of temperature) on the slide and hence, tissues might float off and orientation of tissues would change.

The dried slides are then placed on the hot plate with sections facing up for about 3 mins. Alternatively, can place into the drying oven at 99C for about 10 mins. This is to ensure that the tissue sections are fixed onto the slides so that it would not float off during staining. The heated slides are then manually loaded onto the automated staining machine.

The principle of H&E is to demonstrate the tissue constituents in contrasting colours. Haematoxylin is oxidized to haematein in the presence of an oxidising agent. Haematein is taken up by nucleic acids present in the nucleus in the presence of a mordant. The mordant used is usually a metal that is able to chelate the haematein dye to the tissue component. Eosin stains the cytoplasm and connective tissue pink.


The staining progame is as follows:

1. Xylene (2 mins)
2. Xylene (2 mins)
3 Absolute alcohol (1 min)
4. 95 % alcohol (1 min)
5. 70 % alcohol (30 secs)
6. Running water (30 secs)
7. Haematoxylin (3 ½ mins)
8. Haematoxylin (3 ½ mins)
9. Running water (30 secs)
10. 0.5 % acid alcohol (2 dips)
11. Running water (30 secs)
12. Lithium carbonate (30 secs)
13. Running water (30 secs)
14. Blue in running water (3 mins)
15. Eosin (25 secs)
16. 70 % alcohol (1 min)
17. 95 % alcohol (1 min)
18. Absolute alcohol (1 min)
19. Absolute alcohol (1 min)
20. Absolute alcohol (1 min)
21. Absolute alcohol (1 min)
22. Xylene (1 min)
23. Xylene (1 min)
24. Xylene (1 min or until ready for cover slipping)
25. Depex (using automated machine or manually)


Results:

Nuclei: Blue
Cytoplasm: Pink


The picture above shows and example of H&E staining at 4X maginification. The pictures shows the presence of cracks and folds which may interrupt with the diagnosis. If there are too many faults present, the tissue have to be re-cut and produce another new slide to be stained.

Sunday, October 25, 2009

Serum Protein Electrophoresis

Tng Wess Lee, 0702570C
Clinical Biochemistry

Confirmation of Mband (Identifying Artefacts in SPE).

Serum Protein Electrophoresis (SPE) is a laboratory technique used to separate serum protein into 5 distinct fractions ( albumin, alpha 1, alpha 2, beta, gamma ). It can be used to measure the concentration of the serum protein as well. It can also be used to determine absence of normal proteins and to identify presence of abnormal proteins. SPE is normally requested for myeloma monitoring. It is often requested to identify M-band.

M-band, is a protein which is either immunoglobin or immunoglobin light chains. It will form a distinct band often at the gamma region. M-band is due to excessive production of immunoglobins due to diseases such as multiple myeloma, Monoclonal Gammopathy of Undetermined Significance, chronic lymphocytic leukemia, etc.
However, it is critical to ensure that the M-band seen on the SPE film is of an immunoglobin class. Sometimes, it may be due to artefacts. One good example of an artefact is fibrin frmo a plasma sample which looks like a M-band.

We therefore run immunofixation (IFE) to identify the immunoglobin class of the M-band.

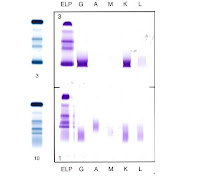
Here are some pictures to illustrate what i have just said.


As you can see, the top blue bands are SPE of a sample which has a M-band. Confirmation from the IFE (purple) shows that the immunoglobin class is IgG/Kappa. However, the bottom blue bands of the SPE, is a plasma sample containing fibrin. It also has a distinct band in the gamma region which looks like a M-band. However when IFE is done, you notice that no distinct band of immunoglobin class appears. Therefore we understand that it is an artefact.

Saturday, October 24, 2009

Sherman: Molecular work

RNA extraction and quantification

The method of extracting and purifying RNA, which will be used for molecular studies

It involves harvesting cells, disrupting cells, homogenizing cells, bind RNA, collect RNA and wash membrane


Materials

  1. Rneasy-free pipette tips (filter tips)
  2. Microcentrifuge
  3. 96-100% and 70% non-denatured EtOH
  4. QIA shredder spin column
  5. Rnase spin column
  6. Pipette
  7. Micropipette
  8. Falcon tube
  9. Light microscope
  10. Counter
  11. RNA extraction kit
    1. RLT
    2. RW1
    3. RPE
  12. MQ water
  13. Cuvettes
  14. Spectrophotometer
  15. Centrifuge


Method

  1. Harvest cells (trypsinisng with treatment & transferring into a falcon tube for centrifuge)
  2. Centrifuge at 600rpm for 5mins, remove supernatant and count cells
  3. Centrifuge the remaining cells and remove the supernatant
  4. Disrupt the cells; on the cell pellets, add 350ul of RLT if the cell count is <>6 cells, or 600ul of RLT for 5 x 10⁶-107. Mix well (an alternative is to vortex for 1min)
  5. Homogenise cells; pipette lysate into QIA shredder spin column in 2ml collection tube (the shredder spin column will cut and lyse the cells more evenly to allow higher RNA yield)
  6. Centrifuge for 2mins at full speed and discard column (the RNA is in the flow-through)
  7. Bind RNA; add 1 volume of 70% EtOH to lysate (flow-through) and mix by pipetting - to precipitate the RNA

* 1 volume = amount of RLT that was added at the given cell count

  1. Collect RNA; transfer 700ul of sample into Rnase spin column in 2ml collection tube - RNA will be trapped in the membrane of the Rnase spin column
  2. Centrifuge for 15secs at full speed. Discard the flow-through
  3. Wash membrane; add 700ul of RW1 to the spin column, repeat the step above
  4. Add 500ul of RPE to the spin column, repeat the step above
  5. Repeat the step above, but centrifuge for 2mins (dry the RNA)
  6. Elute RNA; Transfer the spin column into an eppendorf tube
  7. Add 30ul of Rnase-free water (directly in the middle of the membrane, without touching it)
  8. Centrifuge at max speed for 1min
  9. Repeat the step above, recycling the Rnase-free water. This is to get higher yield of RNA
  10. Collect the flow-through.
  11. Label 5 baby eppendorf tubes for the storage of RNA (stored at -80ºc)
  12. Aliquote 5ul of RNA into the first 4 tubes, and 10ul into the last tube for RNA quantification

RNA quantitation

An absorbance of 1 unit at 260nm corresponds to 40ug of RNA per ml

Aλ260 = 1, concentration = 40ug/ml. To ensure significance, reading should be greater than 0.15

  1. Pipette 2ul of RNA into a cuvette and 498ul of MQ water

*Ensure that the RNA is mixed with the MQ water, otherwise there will be little yield reading

  1. Set up a blank sample (500ul MQ water) and the diluted RNA sample
  2. Insert the cuvettes into the spectrophotometer
  3. Set the wavelength (A260 and A280)
  4. Set reference for the blank to 0.000 absorbance
  5. [RUN] samples according
  6. Take readings for each cell line at the 2 given wavelengths (A260 and A280)

Purity of the RNA is measured by dividing the wavelength at A260 by A280. A ratio of 1.8 - 2.0 will give a pure result

Sunday, October 18, 2009

Rapid test for Dengue Virus,

Dengue virus is a mosquito-borne flavivirus and as everyone knows rapid detection and diagnosis is important. Rapid test kits are being introduced as it is able to detect and provide the result faster than routine laboratory methods like ELISA or Haemagglutination inhibition test.

Dengue Virus IgM / IgG antibody Rapid test kit.


Procedure.

  1. pipette 10 ul of patient serum into the square well
  2. drop 3 - 4 drops of test buffer into the round well
  3. start timer ( 15-20 mins )
  4. read results at 15 - 20mins
  5. results should not be read after 20 mins as false results might be obtained.

Reading of Results.

Purple or blue line should be observed at the C - control


If no line is observed, the test is invalid and have to be repeated.

Positive - purple or blue line observed at either M ( IgM ) or G ( IgG ) and C ( control )


Negative - only control line is observed.


Interpretation.


Positive IgM suggest primary or recent dengue infection.


Positive IgM &/or IgG suggest secondary or subsequent dengue infections.


Kenneth.
TG02

Sunday, September 20, 2009

Trepanema pallidum Haemagglutination Assay

Hi everyone..

For this week i was again attached to the Microbiology department.
I was introduced to a new test called TPHA (Trepanema pallidum Haemagglutination Assay) .This is a confirmatory test used to confirm the presence of Trepanema pallidum(syphillis) in patient's blood sample.


This test is usually done when VDRL result is positive. Since VDRL is not a confirmatory test, this test therefore is important in determining whether the patient really has syphillis or instead due to other contributing factors and conditions which gave a false positive VDRL result.

A false positive VDRL can be encountered in infectious mononucleosis, lupus, hepatitis A, leprosy, malaria and, occasionally, pregnancy.

Hence TPHA test is a very important test to ensure the condition/disease is diagnosed correctly.

This test uses the Serodia-TPHA test kit. It takes 2 hours incubation after which result can be obtained. This test makes use of the 96-well microtiter plate. However for every individual test, only 4 wells (in vertical order) will be used.


These are the reagents used,available in the kit:

1) Unsensitized particles
2) Sensitized particles
3) Sample diluent


The following are the procedures:

1) Pipette 100 ul of sample diluent into the 1st (top most) well
2) Pipette 25ul each into the 2nd, 3rd and 4th wells
3) Dispense 25 ul of serum into the 1st well and pipette up and down to mix the sample diluent with the serum
4) After mixing the contents of the 1st well, pipette out 25ul of the mixture and serially dilute it into the 2nd, 3rd and 4th wells consecutively.
5) The 4th well therefore should have the lowest concentration of serum
6) Using the droppers provided in the kit, add 1 drop of unsensitized particles (Control) into the 3rd well.
7) Add 1 drop of sensitized particles into the 4th well
8)Gently tap the sides of the plate to mix the contents together.
9) Incubate at room temperature for 2 hours,away from any vibrations.
10) After two hours, read the result from the 4th well and report it.

Only the result from the 4th well should be taken into account.


This is an example of how the result may appear.

This picture only shows the 4th well of 4 separate tests.
The 4th well of Test no. 1 and 2 show positive results. For both cases, samples are positive for presence of Trepanema pallidum.
However for the 4th wells of Test no. 3 and 4, results are negative. Hence this shows that no Trepanema pallidum is present and the previous VDRL result is a false positive.


Final result will be reported as REACTIVE (positive) or NON-REACTIVE (negative).


Since this kit takes up to 2 hours for the result to be out, it is thus used only for routine specimens.

For urgent specimens, since the turnaround time is 1 hour, the lab makes use of a different TPHA kit which only takes up 15 min and also has a much simpler procedure.


Alright, that is all for now. Feel free to comment if you have any questions!

Thanks =D

Siti Hawa
TG02
GRP 10

Tuesday, September 15, 2009

Clinical Chemistry: Laboratory Technique

Preparation of Haemolysate for Major Project Experiment

In my major project, i am tasked to evaluate a serum protein electrophoresis system.

Within the evaluation process,i intend to demonstrate the influence of haemolysed samples on the results of the tests. This portion of experiment is conducted for interference study of evaluation process.

As stated, my system separates serum proteins according to their charges along an agarose gel. It separates the proteins into 2 major fractions known as albumin and globulin. The fractions can be further catergorized into 5 minor distinct fractions, known as albumin, alpha-1, alpha-2, beta and gamma.

As you known, when a blood sample is lysed, haemoglobin is released into the serum. Haemoglobin is a protein and therefore may appear as an artefact on the gel presentation, increasing the concentration of alpha-2 and beta protein. Haemoglobin should not appear as a band, as only serum is used to be tested on the analyser.

Therefore, i prepared haemolysed samples to identify the extent of influence of haemolysis on the results. In this posting, i will explain the steps taken to prepare haemolysate. Haemolysate is the preparation of the resulting product of erythrocyte lysis.


HOW DO WE GET HAEMOLYSATE?

1. Obtain a normal blood sample collected in EDTA tube and spin down for 10mins, 3500rpm.
2. Remove plasma and add 10ml of saline to red cell pellet.
3. Resuspend red cells in saline by inverting.
4. Spin for 5mins,3500rpm and decant saline. Step 2-4 constitutes washing of red cells.
5. Conduct washing of red cells for 3 times.
6. Remove saline and add equal volume of deionised water. Mix well by inverting.
7. Freeze cells overnight in freezer.
8. Thaw cells til rtp.
9. Centrifuge mixture for 30mins.
10. Save supernatant. Supernatant = Stock Haemolysate

Stock Haemolysate will be used to spike normal serum to produce different levels of haemolysis status. We achieved 3 levels of serum status (mildly lysed, lysed and severely lysed). These samples will be used to identify the extent of haemolysis on the results of electrophoresis.


Here are some pictures to improve yr imagination of the above information.


These are the fractions along with some specific proteins found within the fractions. (above)


Concentrate on lanes 8-11. 8 is normal serum, 9 is mildly lysed sample, 10 is lysed sample, 11 is severely lysed sample. Look at the alpha-2 and beta region. You will notice increasing concentration.

Tng Wess Lee
0702570C