Sunday, November 8, 2009

Cytology Lab

Nadiah Bte Sukma
0705365e


Hi again...........
Very sorry for the late post...


Cytology laboratory has 2 different departments; Gynaecology and Non-Gynaecology department.


Non-Gynae deals with all kinds of liquid specimens that come from different part of the body, for example; knee aspirate, sputum, urine, FNA fluid from the breast, thyroid or parotid, and pleural fluid. Thus, as intern, i wasnt allow to handle these potential biohazardous materials except for my own urine, and sputum.


Gynae department receives Pap smear materials which come in 2 different method; as conventional slides and in ThinPrep vials.


As the term refers, conventional slides are slides that are already smeared with the materials/specimens and been spray-fixed to protect the cells from any damages by providing a waxy-cover. After properly received, the slides are to be place in 95% ethanol for around 10 mins to remove the coating so as to allow good penetration of dyes during staining. Then they are manually transferred to the automated staining machine for Papanicolaou stain.


Source: http://www.marketingvp.com/payback/cytyc/results.htm
Picture 1: Example of conventional Pap smear slides. The slides received are pre-smeared and spray-fixed.

Specimens that comes in vials (ThinPrep is the commercial name) are gynaecologic samples that are being collected by the clinician using sampling device which is then immersed and rinsed in the vial filled with PreservCyt solution (solution that acts as a preservative). Instead of being smeared on slide then send to cyto lab (conventional slide), the specimen is sent in solution form and so, it has to be prepared on slide first before staining.


Source: http://www.wcpl.com/physician_supplies.asp

Picture 2: Example of specimen vial that is received in cyto lab. The vial contains gynaecologic materials that have been immersed in the solution.

For specimens that are received in ThinPrep vials have to be prepared on slides before staining them to allow easy screening.
The vials are placed in ThinPrep 2000 processor that makes use of mechanical, pneumatic and fluidic principles for cell dispersion, collection and tranfer. This processor makes a relatively thin smear of the specimen materials that covers a specific area of the slides.

Source: httpwebsites.labx.comrankindetail.cfmautonumber=50949

Picture 3: ThinPrep 2000 processor.

The processor initiates a gentle dispersion of the PreserCyt solution that contains patient's material, this will break up blood, mucus, non-diagnostic debris and thoroughly mixes the cell sample. The cell are then collected on a TransCyt Filter specifically designed to collect diagnostic cells. The processor constantly monitors the rate of flow through the fliter during the collection process to control or determine the cellular presentation on the slides; from being too thick or scant. A thin layer of cells is then transferred to a glass slide in a 20mm-diameter circle and the slide is automatically deposited into a fixative solution of 95% alcohol.

ThinPrep processor mainly involves 3 principles.

1. Dispersion of cells; to separate debris and disperse mucus but gives no adverse effect on the cell appearance.

2. Cell collection; diagnostic cells are picked up (by a gentle vacuum) and collected onto the filter membrane.

3. Cell transfer; the collected cells on the membrane are transferred onto a glass slide by gently pressing them onto the surface of the slide. Natural attraction and slight positive air pressure cause the cells to adhere to the microscopic slides resulting in an even distribution of cell in as defined circular area.


Source: http://ssp-labs.com/cytology.html
Picture 4: ThinPrep slides with a defined circular area of cells; processed using the ThinPrep processor.

Histopathology Lab - Staining

Nadiah Bte Sukma

0705365E


Hi......

very sorry for the late post..


STAINING

In histopathology lab, all slides have to be stained using Haematoxylin & Eosin staining. Special stains request will be made after pathologists have seen the H&E slides and decided that the case needs further investigation with different stains eg PAS, GMS, RETIC.

The slides that ready for staining have to be initially air dried by placing on the sides of the hot plate until the wax shows signs of melting. this step is important because placing them directly on the hot plate will create a pool of water and melted wax (caused by sudden change of temperature) on the slide and hence, tissues might float off and orientation of tissues would change.

The dried slides are then placed on the hot plate with sections facing up for about 3 mins. Alternatively, can place into the drying oven at 99C for about 10 mins. This is to ensure that the tissue sections are fixed onto the slides so that it would not float off during staining. The heated slides are then manually loaded onto the automated staining machine.

The principle of H&E is to demonstrate the tissue constituents in contrasting colours. Haematoxylin is oxidized to haematein in the presence of an oxidising agent. Haematein is taken up by nucleic acids present in the nucleus in the presence of a mordant. The mordant used is usually a metal that is able to chelate the haematein dye to the tissue component. Eosin stains the cytoplasm and connective tissue pink.


The staining progame is as follows:

1. Xylene (2 mins)
2. Xylene (2 mins)
3 Absolute alcohol (1 min)
4. 95 % alcohol (1 min)
5. 70 % alcohol (30 secs)
6. Running water (30 secs)
7. Haematoxylin (3 ½ mins)
8. Haematoxylin (3 ½ mins)
9. Running water (30 secs)
10. 0.5 % acid alcohol (2 dips)
11. Running water (30 secs)
12. Lithium carbonate (30 secs)
13. Running water (30 secs)
14. Blue in running water (3 mins)
15. Eosin (25 secs)
16. 70 % alcohol (1 min)
17. 95 % alcohol (1 min)
18. Absolute alcohol (1 min)
19. Absolute alcohol (1 min)
20. Absolute alcohol (1 min)
21. Absolute alcohol (1 min)
22. Xylene (1 min)
23. Xylene (1 min)
24. Xylene (1 min or until ready for cover slipping)
25. Depex (using automated machine or manually)


Results:

Nuclei: Blue
Cytoplasm: Pink


The picture above shows and example of H&E staining at 4X maginification. The pictures shows the presence of cracks and folds which may interrupt with the diagnosis. If there are too many faults present, the tissue have to be re-cut and produce another new slide to be stained.

Sunday, October 25, 2009

Serum Protein Electrophoresis

Tng Wess Lee, 0702570C
Clinical Biochemistry

Confirmation of Mband (Identifying Artefacts in SPE).

Serum Protein Electrophoresis (SPE) is a laboratory technique used to separate serum protein into 5 distinct fractions ( albumin, alpha 1, alpha 2, beta, gamma ). It can be used to measure the concentration of the serum protein as well. It can also be used to determine absence of normal proteins and to identify presence of abnormal proteins. SPE is normally requested for myeloma monitoring. It is often requested to identify M-band.

M-band, is a protein which is either immunoglobin or immunoglobin light chains. It will form a distinct band often at the gamma region. M-band is due to excessive production of immunoglobins due to diseases such as multiple myeloma, Monoclonal Gammopathy of Undetermined Significance, chronic lymphocytic leukemia, etc.
However, it is critical to ensure that the M-band seen on the SPE film is of an immunoglobin class. Sometimes, it may be due to artefacts. One good example of an artefact is fibrin frmo a plasma sample which looks like a M-band.

We therefore run immunofixation (IFE) to identify the immunoglobin class of the M-band.

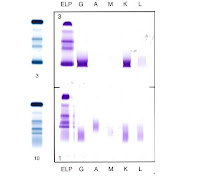
Here are some pictures to illustrate what i have just said.


As you can see, the top blue bands are SPE of a sample which has a M-band. Confirmation from the IFE (purple) shows that the immunoglobin class is IgG/Kappa. However, the bottom blue bands of the SPE, is a plasma sample containing fibrin. It also has a distinct band in the gamma region which looks like a M-band. However when IFE is done, you notice that no distinct band of immunoglobin class appears. Therefore we understand that it is an artefact.

Saturday, October 24, 2009

Sherman: Molecular work

RNA extraction and quantification

The method of extracting and purifying RNA, which will be used for molecular studies

It involves harvesting cells, disrupting cells, homogenizing cells, bind RNA, collect RNA and wash membrane


Materials

  1. Rneasy-free pipette tips (filter tips)
  2. Microcentrifuge
  3. 96-100% and 70% non-denatured EtOH
  4. QIA shredder spin column
  5. Rnase spin column
  6. Pipette
  7. Micropipette
  8. Falcon tube
  9. Light microscope
  10. Counter
  11. RNA extraction kit
    1. RLT
    2. RW1
    3. RPE
  12. MQ water
  13. Cuvettes
  14. Spectrophotometer
  15. Centrifuge


Method

  1. Harvest cells (trypsinisng with treatment & transferring into a falcon tube for centrifuge)
  2. Centrifuge at 600rpm for 5mins, remove supernatant and count cells
  3. Centrifuge the remaining cells and remove the supernatant
  4. Disrupt the cells; on the cell pellets, add 350ul of RLT if the cell count is <>6 cells, or 600ul of RLT for 5 x 10⁶-107. Mix well (an alternative is to vortex for 1min)
  5. Homogenise cells; pipette lysate into QIA shredder spin column in 2ml collection tube (the shredder spin column will cut and lyse the cells more evenly to allow higher RNA yield)
  6. Centrifuge for 2mins at full speed and discard column (the RNA is in the flow-through)
  7. Bind RNA; add 1 volume of 70% EtOH to lysate (flow-through) and mix by pipetting - to precipitate the RNA

* 1 volume = amount of RLT that was added at the given cell count

  1. Collect RNA; transfer 700ul of sample into Rnase spin column in 2ml collection tube - RNA will be trapped in the membrane of the Rnase spin column
  2. Centrifuge for 15secs at full speed. Discard the flow-through
  3. Wash membrane; add 700ul of RW1 to the spin column, repeat the step above
  4. Add 500ul of RPE to the spin column, repeat the step above
  5. Repeat the step above, but centrifuge for 2mins (dry the RNA)
  6. Elute RNA; Transfer the spin column into an eppendorf tube
  7. Add 30ul of Rnase-free water (directly in the middle of the membrane, without touching it)
  8. Centrifuge at max speed for 1min
  9. Repeat the step above, recycling the Rnase-free water. This is to get higher yield of RNA
  10. Collect the flow-through.
  11. Label 5 baby eppendorf tubes for the storage of RNA (stored at -80ºc)
  12. Aliquote 5ul of RNA into the first 4 tubes, and 10ul into the last tube for RNA quantification

RNA quantitation

An absorbance of 1 unit at 260nm corresponds to 40ug of RNA per ml

Aλ260 = 1, concentration = 40ug/ml. To ensure significance, reading should be greater than 0.15

  1. Pipette 2ul of RNA into a cuvette and 498ul of MQ water

*Ensure that the RNA is mixed with the MQ water, otherwise there will be little yield reading

  1. Set up a blank sample (500ul MQ water) and the diluted RNA sample
  2. Insert the cuvettes into the spectrophotometer
  3. Set the wavelength (A260 and A280)
  4. Set reference for the blank to 0.000 absorbance
  5. [RUN] samples according
  6. Take readings for each cell line at the 2 given wavelengths (A260 and A280)

Purity of the RNA is measured by dividing the wavelength at A260 by A280. A ratio of 1.8 - 2.0 will give a pure result

Sunday, October 18, 2009

Rapid test for Dengue Virus,

Dengue virus is a mosquito-borne flavivirus and as everyone knows rapid detection and diagnosis is important. Rapid test kits are being introduced as it is able to detect and provide the result faster than routine laboratory methods like ELISA or Haemagglutination inhibition test.

Dengue Virus IgM / IgG antibody Rapid test kit.


Procedure.

  1. pipette 10 ul of patient serum into the square well
  2. drop 3 - 4 drops of test buffer into the round well
  3. start timer ( 15-20 mins )
  4. read results at 15 - 20mins
  5. results should not be read after 20 mins as false results might be obtained.

Reading of Results.

Purple or blue line should be observed at the C - control


If no line is observed, the test is invalid and have to be repeated.

Positive - purple or blue line observed at either M ( IgM ) or G ( IgG ) and C ( control )


Negative - only control line is observed.


Interpretation.


Positive IgM suggest primary or recent dengue infection.


Positive IgM &/or IgG suggest secondary or subsequent dengue infections.


Kenneth.
TG02

Sunday, September 20, 2009

Trepanema pallidum Haemagglutination Assay

Hi everyone..

For this week i was again attached to the Microbiology department.
I was introduced to a new test called TPHA (Trepanema pallidum Haemagglutination Assay) .This is a confirmatory test used to confirm the presence of Trepanema pallidum(syphillis) in patient's blood sample.


This test is usually done when VDRL result is positive. Since VDRL is not a confirmatory test, this test therefore is important in determining whether the patient really has syphillis or instead due to other contributing factors and conditions which gave a false positive VDRL result.

A false positive VDRL can be encountered in infectious mononucleosis, lupus, hepatitis A, leprosy, malaria and, occasionally, pregnancy.

Hence TPHA test is a very important test to ensure the condition/disease is diagnosed correctly.

This test uses the Serodia-TPHA test kit. It takes 2 hours incubation after which result can be obtained. This test makes use of the 96-well microtiter plate. However for every individual test, only 4 wells (in vertical order) will be used.


These are the reagents used,available in the kit:

1) Unsensitized particles
2) Sensitized particles
3) Sample diluent


The following are the procedures:

1) Pipette 100 ul of sample diluent into the 1st (top most) well
2) Pipette 25ul each into the 2nd, 3rd and 4th wells
3) Dispense 25 ul of serum into the 1st well and pipette up and down to mix the sample diluent with the serum
4) After mixing the contents of the 1st well, pipette out 25ul of the mixture and serially dilute it into the 2nd, 3rd and 4th wells consecutively.
5) The 4th well therefore should have the lowest concentration of serum
6) Using the droppers provided in the kit, add 1 drop of unsensitized particles (Control) into the 3rd well.
7) Add 1 drop of sensitized particles into the 4th well
8)Gently tap the sides of the plate to mix the contents together.
9) Incubate at room temperature for 2 hours,away from any vibrations.
10) After two hours, read the result from the 4th well and report it.

Only the result from the 4th well should be taken into account.


This is an example of how the result may appear.

This picture only shows the 4th well of 4 separate tests.
The 4th well of Test no. 1 and 2 show positive results. For both cases, samples are positive for presence of Trepanema pallidum.
However for the 4th wells of Test no. 3 and 4, results are negative. Hence this shows that no Trepanema pallidum is present and the previous VDRL result is a false positive.


Final result will be reported as REACTIVE (positive) or NON-REACTIVE (negative).


Since this kit takes up to 2 hours for the result to be out, it is thus used only for routine specimens.

For urgent specimens, since the turnaround time is 1 hour, the lab makes use of a different TPHA kit which only takes up 15 min and also has a much simpler procedure.


Alright, that is all for now. Feel free to comment if you have any questions!

Thanks =D

Siti Hawa
TG02
GRP 10

Tuesday, September 15, 2009

Clinical Chemistry: Laboratory Technique

Preparation of Haemolysate for Major Project Experiment

In my major project, i am tasked to evaluate a serum protein electrophoresis system.

Within the evaluation process,i intend to demonstrate the influence of haemolysed samples on the results of the tests. This portion of experiment is conducted for interference study of evaluation process.

As stated, my system separates serum proteins according to their charges along an agarose gel. It separates the proteins into 2 major fractions known as albumin and globulin. The fractions can be further catergorized into 5 minor distinct fractions, known as albumin, alpha-1, alpha-2, beta and gamma.

As you known, when a blood sample is lysed, haemoglobin is released into the serum. Haemoglobin is a protein and therefore may appear as an artefact on the gel presentation, increasing the concentration of alpha-2 and beta protein. Haemoglobin should not appear as a band, as only serum is used to be tested on the analyser.

Therefore, i prepared haemolysed samples to identify the extent of influence of haemolysis on the results. In this posting, i will explain the steps taken to prepare haemolysate. Haemolysate is the preparation of the resulting product of erythrocyte lysis.


HOW DO WE GET HAEMOLYSATE?

1. Obtain a normal blood sample collected in EDTA tube and spin down for 10mins, 3500rpm.
2. Remove plasma and add 10ml of saline to red cell pellet.
3. Resuspend red cells in saline by inverting.
4. Spin for 5mins,3500rpm and decant saline. Step 2-4 constitutes washing of red cells.
5. Conduct washing of red cells for 3 times.
6. Remove saline and add equal volume of deionised water. Mix well by inverting.
7. Freeze cells overnight in freezer.
8. Thaw cells til rtp.
9. Centrifuge mixture for 30mins.
10. Save supernatant. Supernatant = Stock Haemolysate

Stock Haemolysate will be used to spike normal serum to produce different levels of haemolysis status. We achieved 3 levels of serum status (mildly lysed, lysed and severely lysed). These samples will be used to identify the extent of haemolysis on the results of electrophoresis.


Here are some pictures to improve yr imagination of the above information.


These are the fractions along with some specific proteins found within the fractions. (above)


Concentrate on lanes 8-11. 8 is normal serum, 9 is mildly lysed sample, 10 is lysed sample, 11 is severely lysed sample. Look at the alpha-2 and beta region. You will notice increasing concentration.

Tng Wess Lee
0702570C

Sunday, September 13, 2009

Sherman - Histopathology

Frozen sections

A procedure where a biopsy is taken, frozen and diagnosed by a pathologist within a short period of time

Frozen section is done on the account that the patient is currently undergoing an operation, and had a biopsy which requires immediate attention.
The entire procedures goes to such an extent that time is of an essence, a simple reason being that whiles all these are being done, the patient is still sedated.
A guideline for such procedures to be done is within 10mins per sample


The entire procedure in the laboratory goes as follows;

1. Retrieval of sample
The medical technologist will proceed to the operating theatre and collect the biopsy. The name, time of collection and sample type must be confirmed upon collection.
This entire procedure should take the most 10mins only. Be aware to have a hand free of gloves due to operation of the elevators

2. Transport of sample back to laboratory and processing
Clock in the time received and inform the pathologist which is involved with the case given. Ensure that the workbench is ready for the pathologist to trim the specimen

3. Scribing of information
As the pathologist trims, it is essential that all information that the pathologist disclose upon gross examination of the sample is recorded.

4. Preparation of the chuck for frozen section
Prepare the chuck with O.C.T compound (a compound which gives the freezing effect). The tissue is mounted into the compound and brought to the Tissue Tek (a microtome used for frozen section).

5. Sectioning of the tissue
The tissue is sectioned within the enclosed space of the Tissue Tek. The microtome operates similarly to a conventional microtome, only is done within the cold environment, otherwise the tissue will be damaged. All equipment (brushes etc) are to be kept in the cold environment too. A difference in temperature in the equipment can cause the tissue samples to stick onto it due to the thermal gradient, thus destroying the tissue. The tissue is mounted onto a slide and subjected to rapid stain


6. Rapid stain
- Formalin (after that rinse for 1min in running water)
- Hematoxylin for 1min (rinse the hematoxylin away in running water)
- Lithium carbonate
- Absolute alcohol
- Absolute alcohol
- Xylene
- Xylene

7. Mount in DPX
8. Present slide to pathologist for observation under microscope.
Clock in the time too when the pathologist has finished with the necessary diagnosis.

Monday, September 7, 2009

Histopathology Lab

Nadiah Sukma TG02


Helo0o..

for today's post, i'll be sharing with u what ive learnt in the main lab. basically it is a continuation of my first post.

Once the tissue are processed, they will have to be embedded, sectioned and stained. and all this takes place in the main lab.


Embedding

After the completion of the processing cycle, the tissues are removed from the tissue processing machines to the blocking room for embedding.
Processed tissues are placed in molten paraffin (56 C melting point) such that after the paraffin cools, the tissue and paraffin wax will form a block of sufficient consistency to cut thin sections.
Embedding can done by:
  1. Filling a mould of suitable size with molten wax
  2. Orientating the specimen in the mould to ensure it is being cut in the right plane
  3. Cooling the mass to promote solidification

Orientation of tissue specimen:

  1. Tissue specimens must be embedded flat to ensure that a complete section is obtained.
  2. Tissues must be placed such that the resistance to the knife flows from lower to greater amount. this is to achieve smooth sections as the knife cuts through the soft to the hard part of the specimen.
  3. There should be adequate paraffin wax surrounding the tissue to provide maximum cutting support. (must ensure there is no air bubbles which will results to holes in the block)
  4. Tubular structures such as veins and arteries and fallopian tubes must be embedded vertically in the mould such that the knife cuts across the lumen.
  5. Tissues with epithelial surfaces such as skin, intestine, gallbladder and uterus must be positioned such that all tissue layers are cut across.
  6. Multiple specimens should be placed side by side, close to each other so that all pieces can be sectioned.
  7. Rectangular tissues should be placed parallel to each other with their long axis perpendicular to the plane of section.
  8. Small bisected cyst (half of a sphere shape) must be embedded with the cut surface down and must ensure that no air bubbles are trapped in the praffin.
  9. Muscle biopsies in 2 pieces should be embedded with one piece in a longitudinal and the other in vertical position.

Shaving

After solid blocks are formed and cooled, they are sent for shaving also known as rough cutting before they are ready for sectioning. Shaving at 20 microns is to removed the paraffin wax and to expose the entire surface of the tissue including the margins.

*If entire surface could not be exposed due to un-flat embedding, the blocks must be sent for re-blocks.

Once shaved, the blocks are then soaked in 10% fabric softener for 5 mins. This is to smoothen the tissue surface to ease sectioning to obtain very thin ribbons.But using a commercial softener is not essential. it is also possible to just soak them in cold water for 5 mins.

*Tiny biopsy tissues and fats should NOT be soaked.

Microtomy

After shaving and soaking, all blocks must be kept cool at all times , hence they are placed on a cooler before being sectioned.

Sectioning using rotatory microtome is to produce 4 microns (one cell thick) thick of section to be fixed on microscopic glass slide for easy examination under the microscope.

Things needed:

  1. Rotatory microtome
  2. Warm floatation water bath (48 +- 4C)
  3. 1% alcohol cold floatation bath (95% alcohol 5ml and SRW 500ml)
  4. Microscopic glass slides
  5. Forceps, brush and pencil.

Sections are cut using an undamaged part of the knife. The motion must be continuous to produce even thickness sections and long ribbon of sections. Interrupted motion or change of speed during cutting will result in uneven thickness which can be seen after staining under the microscope.

The long ribbon of large tissue specimens produced are then transferred to the 1% alcohol foatation bath first before transferring to the warm bath for fishing. The ribbon is let to float in the alcohol solution to expand the tissue to prevent folds (or to unfold the tissue when the folds are difficult to get rid using forceps, brush). This is because alcohol having low vapour pressure will increase the surface tension of the tissue when transferring to the heated floatation bath. Once the section has spread sufficiently, they are then transfered on to the glass slides and sent for staining (H&E or Special stains).

OKIES thats all for now..

my next post will be on staining...

Thanks! have a happy happy day...


Sunday, August 30, 2009

Medical Microbiology - Virology Serology Laboratory Techniques

Low Wei Qi Kenneth TG02


Hello everyone,

this time im going to share another serology technique in detecting viruses total antibody for Influenza A, Influenza B, Herpes Simplex and many others. The test is known as Complement Fixation Test ( CFT). This test uses the properties of complement to lyse cells in the presence of antigen-antibody complexes.

CFT is used to detect the presence of specific antibody in the patient's serum. this test utilizes sheep red blood cells (sRBCS), anti-sRBCS antibody, complement and specific Ag. If Ab is present in the serum, the complement will be completely utilized and sRBC lysis will be minimal. If the Ab is not present in the serum, then complement will bind to anti-sRBC antibody and cause sRBCs to hemolyse.

Sooo here is the STEP BY STEP:
  1. 50ul of serum specimen is diluted with 350ul of veronal buffer (VB)
  2. diluted specimen is then heat inactivated at 56 degree celsius for 30 minutes
  3. after inactivation, 25 ul of VB is added to the microtiter wells except the first row
  4. 50 ul of specimen is added to the first well
  5. titrate 25 ul of specimen from the first well downwards
  6. 25 ul of viral antigen is added to each well
  7. 25 ul of complement is added to each well
  8. the microtiter plate is then incubate at 2-8 degree celsius overnight

Next day,

  1. sRBC is washed using VB for three times
  2. 24 ul of sRBC is mixed with 24 ul of hemolysin
  3. 50 ul oof sRBS mixture is added to the wells
  4. the plate is incubated for 30 minutes at 37 degree celsius
  5. after incubation, the plate is centrifuged at 2000rpm/ 4 degree celsius for 10 mins
  6. reading of results

Controls involved

Antigen control - using positive and negative antigen

serum control - using serum only

complement control - complement at different concentrations and insensitized cells


Reading of Results

Positive - no hemolysis/ button observed - meaning patient serum contains Ab to virus

Negative - hemolysis/ no button observed - meaning patient serum does not contain AB to virus

for more understanding you can visit

http://www.cehs.siu.edu/fix/medmicro/cfix.htm

thanks,

kenneth

Saturday, August 22, 2009

Sherman - Histopathology

This time I'm gonna post something which I saw and witness. Doesn't really have much principles in it, but it's just a good experience to see it.

If you find it disgusting or anything in whatever I'm gonna state, you may close and try to read again soon ~ but it's really interesting!


In the Histopathology department, post mortem refers to the medical examination done to a dead body. In this case, it’s a baby.
It's kinda scary when you first see it...cos it's like a formed baby, then it's gonna get cut open and have its organs removed and all, like a nice body being physiologically ruined.
These incisions and cuts have to be done very carefully, and very gently. Stillborn babies can range from those barely formed to those that are already fully formed, near the 5th month of pregnancy etc.
The state at which the pathologist has to adopt to retrieve the organs have to be dependent on the stillborn's age. For example, a not yet fully developed foetus is most likely to have a liquified brain after the skull has been cut open, so the pathologist has to be careful so as to not "spill" the brain contents.


The necessary sharps are needed like surgical scissors, scapel, metal ruler and forceps.


The steps are crucial and the body has to be treated with absolute care.

The body is examined for physical deforms. Actions done are as follows;
- Probing the nose with a probe till the end of the skull (check clearing of nose)
- Checking of the eyes
- Opening of the mouth
- Checking of the ears, with reference to the distance from the eyes
- Measuring the limbs, chest width, abdomen width, spine
- Ensure fingers and toes are separated
- Check the genitals and anus
- Check for a straight spine

Preparation:
Formalin
- To fix the organs that was removed.

Organs (removed in their order from superior to inferior sections of the body)
- The brain is removed first
The scalp is sliced open, followed by an incision of the skull with a surgical needle along the line of the skull.
The skull will then be pried open (like a banana skin) to expose the brain
The linings of the brain is cut, and the brain is removed and then fixed into formalin

- The pituitary gland is removed next
It is located just below the brain and is cut out using a scalpel blade. The gland resembles a rectangle shape. It is located in the middle, behind the posterior cartilage. You can picture the inside of the skull from a bird's eye view...the pituitary gland is right in the "bull's eye" of the cavity.

- The torso is then sliced open. A T-shape cut will be done, as per normal for an adult autopsy. The straight line will be cut across the chest, from shoulder to shoulder, and a vertical line cut down from the neck to the pelvic area. The skin and subcutaneous tissues are to be cut through, as there is no need to remove muscle by muscle.
The attachment under the rib-cages is to be cut, along with soft tissues.

- Remove the thoracic cavity

- Remove the thymus (located below the neck)

- Check the morphology of the organs
E.g. check pulmonary veins, branches from the aorta, isomerism, and pathological findings
* All pathological findings are to be photographed *


- Removal of the intestine
The mesentery is cut between the intestines. It suspends the intestine in the abdominal cavity and stops it being disturbed when a person is physically active.
The intestine is removed as a long strand. Keep in mind to take note to make sure that the intestine has the bile stain
For the small intestine, remove it until it reaches the duodenum, cut it off
For the large intestine, remove it until it reaches the rectum, cut it off.
Measure both intestines and fix formalin into it via needle (the mucosa will not fix easily under external exposure conditions to formalin)

- Removal of stomach, kidney, pancreas, adrenal, and spleen.
All linings of the internal organs are to be cut from the esophagus to the rectum, and the entire digestive system complex is removed by cutting through the urinary tract.

- Removal of salivary glands

- Removal of skeletal muscles (to look out for myopathy etc)

- Removal of ribs for sampling (3 ribs maximum)

- Removal of portion of spinal cord

- Breaking down of digestive system complex
From the posterior
a. Removal of kidneys (for pediatrics, do not remove kidneys from capsules). Keep in mind the removal of renal tubules along with the kidneys
b. Removal of adrenal
c. Removal of pancreas
d. Removal of heart and lungs as a complex. Formalin is injected into the lungs and heart to inflate the organs.
e. Removal of stomach (the stomach is cut open)
f. Liver: Removal of anterior (more effective fixation)


Finishing up

- Disposal of all sharps
- Excess parts are to be returned to the body (the incisions will be patched up by glue, returning the baby's physiological shape to the way it is before the autopsy)
- Fix all organs that were retrieved

Processing in cassettes
- All parts that are taken from the body are to be placed into cassettes for processing in the tissue processor before embedding
- All organs that are to be put into cassettes are to maintain a spare portion in case more samples are needed.


It may be disgusting, especially to imagine it, but after a few looks, it'll seem fine. Hahahaha!
Amazingly too, if you're not very confident about your Human Anatomy, somehow just by looking at an autopsy, where all the organs are removed piece by piece, somehow just by looking you can just memorised the entire basic anatomy of the human body...it's easier somehow just by looking at it in real life.


Well there isn't much to ask also~ it's just steps and procedures. But I'll try to answer questions if you have them. I'll try my best! =D


Happy SIP!

Sunday, August 9, 2009

Week 7: Administrative Department =D

Hello everyone..=)
This week is my 3rd week in the administrative section of the lab, as every month i will be rotated between the Microbiology and Administrative section with another student.

Although the admin department do not carry out diagnostic tests and experiments,
it is still a very important section of the lab as every sample that reaches the lab will be registered by the admin staff first before any tests can be done.

The admin department is responsible for ensuring the lab conform to the turnaround time for every specimen. They are also responsible for ensuring all urgent specimens are prioritized.

In the administrative department, i was introduced to all
aspects of the Laboratory Information System (LIS),
where registration of samples and tests that are ordered for each sample are done.
Apart from that LIS is also linked to HIS (Hospital Information System) and CMS(Central Management System), from which details and particulars of patients, tests previously ordered, as well as approved test results can be derived from.

Occasionally, we would receive calls from staffs ranging from nurses, doctors, patients themselves and even the dispatchers.

I was trained for the first week on how to attend to the wide range of queries the callers will make.

Doctors and nurses from other clinic branches under the hospital will at times
call to query on the availability and test codes of a particular test that
they are interested in doing.
Dispatchers may also call to ask if there are any samples to be dispatched
to a certain area in Singapore they are in charge of handling.

However most of the time the administrative department would receive calls from the different centres in the hospital (eg. Aesthetic centre,Women's Centre, Operating Theatre, different wards,etc) requesting for the time test results will be out in the system.

We would then have to dial the laboratory med tech in charge of the test
( eg. dial the Hematology section to query on Full Blood Count result; etc) and transfer back to the caller to provide them with necessary details and progress of the test they previously queried on.

Registration of specimens are the most common task in the admin department.

Peak hours for registration of samples is usually from 4.30pm-5.30pm as dispatchers will then arrive in the lab with bags containing specimens coming from different clinic and branches under the hospital all over Singapore.
Every specimen from a patient will come with a request form where tests ordered for the patient are indicated.

Different codes are assigned to different types of specimens ( eg. 01 for EDTA blood, 02 for PLAIN blood, 13 for FLUORIDE, 23 for URINE, etc).
Every lab test has its own 6-digit test code; and 6-digit profile codes on the other hand are assigned to different test packages (lab tests ordered in bulk).

Every admin personnel is given an ID and password to access the LIS.
Hences, specimen registration as well as ammendment of tests
and patient particulars can be traced back to the personnel
who made the changes to the data. This way the management is able to trace who is responsible for any changes and hence maintain a high level of security to the data in the LIS.

The admin section can be refered to as the central unit of the lab
as it is connected to all sections of the lab (Haematology, Immunology,etc ) as well as the rest of the hospital and its clinics.

They are responsible for communicating with patients, nurses,
doctors and laboratory medical technologists themselves.
Hence, they have a huge role in maintaing the overall workflow of the lab.

In all, i had a great experience in the administrative department =D
Good communication is key when working in the admin department. Even though the tasks assigned is different with that in Microbiology department, there are definitely more unexpected challenges in the administrative department.

I hope this gave you an idea how administrative work in the lab is like.
Feel free to comment me if you have any questions!

Siti Hawa Bte Azali
0704087F
TG02

Monday, August 3, 2009

Analysis of RBC Folate using DXI

Tng Wess Lee, 0702570C
Clinical Biochemistry Lab (CCHEM)

Test: Analysing RBC Folate using DXI.

The test for RBC folate analysis falls under the anaemia panel category. It is used to diagnose the specific cause of anaemia. As we know, folate is used in the synthesis for RBC. Folate deficiency would cause megaloblastic anaemia.

Clinicians request for folate test to identify the specific cause of anaemia. As Vit B12 or iron deficiency might lead to anaemia too. The reason to call for RBC folate is because RBC folate is the best indicator of long-term folate stores. A low value would indicate a prolonged folate deficiency.

Before manually loading the sample (which requires RBC Folate analysis), the blood tube is treated first. Blood is received in an EDTA tube to prevent the clotting of the red cells, as the test requires analysis through the red blood cells and not the serum. This tube cannot be loaded into the LAS system to the prepared for analysis as the EDTA tube is of a smaller size compared to plain tubes or fluoride tubes.

Prior to treatment of the blood sample. Prepared (frozen) controls are thawed. Controls come in 3 levels. There are 3 levels of controls. Level 1 (low), Level 2 (medium) and Level 3 (high). Each level contains a standard and stated value, which falls within the reference range. Controls are use to determine the accuracy of the calibration.

After controls are thawed. Treatment of patient’s sample and controls proceed.

Treatment of blood sample

1) Lyse 50uL of sample and all 3 levels of control with 1000uL lysing agent.
2) Vortex all tubes
3) Wrap lysates with aluminium foil and store them in the cupboard for 1.5hrs
4) Remove wrappings, and manually load them into DXI analyser
5) After controls are verified and passed, load patient sample to be analysed

Reference interval of RBC folate: 776-1784nmol/L

Thursday, July 23, 2009

Week 5: Histopathology Lab

Name: Nadiah Sukma
Admin number: 0705365E


hello people..

it is now my turn to share the experiences ive gained within this 5 week of very-tiring-yet-fun SIP... First, i have to explain the different parts of the working area. According to our schedule we'll be posted to 4 months of Histopathology lab and a month of Cytology.
In Histo lab, there are;

1. Outside area

  • Reception/ Specimen sorting room
  • Trimming room

2. Inside area- Main lab

  • Embedding
  • Microtomy
  • Staining (H&E and Special Stains)
  • Sorting slides + Verification of patient's form + Signed out to the respectives pathologists

For this month, im posted to the outside area (but most of the time im in the trimming room, assisting the pathologist).

All specimens that comes, will be received at the reception room, where the technologists have to first, verify the specimens against the checklist. If nature and the number of specimens (Specimens A, B anc C etc) correspond to the ones listed on the checklist, they are initialed, electronically dated and billed. Second, all the specimens are then given individual biopsy number (eg PB XXXXX) which will be its ID throughout the whole process.

The specimens will then be sorted out. The small and simple biopsies (eg; polyps, certain gallbladder and appendix) are given to technologists for them to pass (not necessarily trim, cos some are too small) and the large and complex specimens (eg; breast, liver, lung, kidney, nose, colon, ovarian cysts + fallopian tubes, enlarged gallbladder and prostate gland) are for pathologists to trim.

[[fyi: all specimens comes in a bag of formalin to be fixed. they have to be sufficiently fixed for atleast 6 hours before being trimmed]]

and..... all trimmings are done in the trimmning room... (haha!) thats where my main job is... which is to assist the pathologists. there are 3 stations in the room, so 3 pathologist are able to trim at a time. but sometimes more pathogists come in to do other stuff and thats just plain havoc for me...hehe

Before trimming, i have to prepare a set of cassettes (remember during HTech we use green colour cassette to embed?) for each specimens; labelling them with patient's ID, specimen ID and block ID. Then prepare the request/patient's form for pathologists. bla bla bla... n other necessary stuff.....that, in a way or another assist them in their trimming... hehehe

After trimming, the blocks are placed into an automated tissue processor. The process takes around 9.5 hours but is left over night (coz our lab, no night shift) and will be ready at the time that we set (eg; 7.30 am)

Principles of tissue processing:

3 stages of the tissue processing are designed to remove the extractable water from the tissue specimens and replace it with a medium that solidifies to allow sectioning. It must be firm enough to support the tissue and give it the rigidity and at the same time must be soft enough for the knife to cut through the tissue into thin sections with little or no damage.

1. Dehydration of tissue

Since the specimens are prior fixed in formalin, dehydration is to remove both water and the fixative (formalin) from the tissue using graded alcohol (dehydrating fluid). This step is essential because paraffin wax will not penetrate the tissue in presence of water and placing the specimens directly into 100% alcohol will distort the tissue.

2. Clearing the tissue

Since alcohol (dehydrating fluid) is completely not miscible with wax, it has to be removed from tissue and replacing it with fluid that is completely miscible with both dehydrating fluid and embedding medium (paraffin wax). common eg; xylene.

3. Infiltrating the tissue with paraffin wax.

Replacing the clearing agent with paraffin wax; infiltrating (impregnating) the tissue with embedding medium. Specimens are transfered from the clearing agent to molten wax at 60C and diffusion will occur. This step is different from the embedding step itself because at this stage the wax provides support internally and externally to the tissue.

Factors affecting tissue processing rate:

1. Agitation

Too slow => ineffective

Too vigorous => cause damage to soft and friable tissue.

2. Heat

Heat increases the rate of penetration.

3. Viscosity

Low viscosity => easier to diffuse into tissue

4. Vacuum

Removes air bubbles trapped within the tissue and able to bring the processing fluids into more intimate contact with parts of the tissue.

[i dont think stating the steps involved in the processing is appropriate, because there are many type of processing, each different in length time eg; 9.5 hr, 13 hr, 16 hr, and the steps involved are also different]

At the end of the processing, the blocks are ready to be embedded, sectioned and stained. (main lab)

and anw, unlike rachael, i didnt have the chance to witness a post-mortem.. =(

*First posted on THURSDAY 23 july, last editted on Monday.

=) =) =)

Sunday, July 19, 2009

Week 4: Sherman

Hey guys! This is the 4th week, and it's my turn to post!


My topic will be on Biochemistry, Urinalysis.

The main aim of this test is to determine the perimeters that are present in the urine, for example, erythrocytes, proteins, bilirubin and leukocytes.

The material used is basically the dipstick.


Control:
2x Controls (1x Normal and 1x Abnormal)


The important perimeters that must be highlighted in the urine perimeter are the following;
1. Leukocytes
2. Nitrate
3. Protein
4. Erythrocyte
These 4 perimeters, under a normal condition, is tested negative of these component presence.
A deviation from JUST 1 of these perimeters from a normal condition, for e.g. a 4+ grade on Protein component, the urine sample is considered abnormal, and should be sent for microscopy examination.


Microscopy examination
Criteria: Urine is tested abnormal from dipstick test
Aim: To identify the different components present in the urine and count the number of cells present in the cells (e.g. White Blood Cells, Erythrocytes, Epithelial cells, Fungi)

* Counting of cells under microscopy examination
For control tests, all 81 grids of the counting chamber has to be counted, and records of the control test is to be taken down.
*The main perimeters to count are the RBC and WBC*
- If the WBC count exceeds >50 for a "Children Emergency" case, it's immediately sent for further testings.

Certain KEY perimeters to look out for in urine samples under the microscope:

1. Red Blood Cells
Variety of renal and systolic diseases, including trauma

2. White Blood Cells
Presence indicates an infection

3. Epithelial Cells
Active tubular degeneration
Squamous epithelil found in normal urine

4. Crystals
Urine is considered abnormal is the following are identified; cystine, leucine nd tyrosince
Varible to the pH of urine
E.g. Squarish crystals are calcium oxidate
Hexagonal crystals are uric acid

5. Bacteria
Evidence of infection (e.g. UTI)

6. Yeast
Urinary moniliasis

7. Casts


Further tests

Under certain circumstances, results reflected in the dipstick results will lead to further tests to confirm the reliability of the dipstick results (e.g. Bilirubin level)

If there is bilirubin detected in the urine, Fouchet is done

1. Mix well, 2 parts of urine with 1 part of Barium Chloride
2. Shake and observe for precipitation
3. If there is no precipitation, add 1 drop of saturated ammonium sulphate
4. Once the precipitate is obtained, filter the mixture and obtain the residue on the filter paper
5. Add 1 drop of Fouchet's reagent onto the residual area
5. Observe for a blue colour change
*A blue colour change is evident of bilirubin presence


Ok so that's all from me! =)
Any questions, feel free to comment and I'll answer it as soon as I can.

Till then, ciaos ~

Replies to Comments

Hello Wess,

sorry for not being very clear. The numbers are the values obtain when the absorbance is measured at 450nm.
And it when the control is 0.350, whether its the positive control or the negative control, the run has to be rejected and troubleshooting must be carried out.

~~~~~~~~~~~~~~~~~~~~~~~~~~~~~~~~~~~~~~~~~~~~~~~~~~~~~~~~~~~~~~~~~~~~

Hello Siti,

for the negative results its less than 0.85 x COV, sorry for the typo.
as for false positive, yes it is possible as VZV IgG may crossreact with other antigens found in Herpes viridae species. And to confirm, VZV IgM immunofluorescence assay (IF) can be carried out to further confirm the diagnosis.

~~~~~~~~~~~~~~~~~~~~~~~~~~~~~~~~~~~~~~~~~~~~~~~~~~~~~~~~~~~~~~~~~~~~

Hello YinLiang,

sorry for not stating, the absorbance used for reading is 450nm.
And DUHHHH, other viruses that can be detected using ELISA is dengue virus and rubella virus.


~~~~~~~~~~~~~~~~~~~~~~~~~~~~~~~~~~~~~~~~~~~~~~~~~~~~~~~~~~~~~~~~~~~~

thanks,
kenneth

Tuesday, July 14, 2009

Medical Microbiolgy - Virology Serology Laboratory Techniques

Low Wei Qi Kenneth - TG02


Hello everyone,

SO sorry for a week delay of the blog sharing. For the few weeks of attachment, i'm attached to virology serology lab which performs tests on human serum mainly detecting Ag and Ab of specific virus. The test i'm going to share is ELISA ( Enzyme linked immunosorbent assay) or EIA (enzyme immunoassay).


Test - Human Varicella Zoster Virus (VZV) IgG Enzyme immunoassay ( EIA/ELISA)


The purpose of this test is to detect Immunoglobulin G antibodies to VZV in patients' serum where VZV is a virus that commonly causes chickenpox in humans.


In my lab, they use commercial test kits which provide all the reagents and pre-coated microtiter strip wells. The base of the wells serve as the solid phase are pre-coated with VZV antigens and by adding the patients serum and incubate it at room temperature, if the IgG antibodies are present it will bind to the antigens at the solid phase. After incubation, the wells are washed using the washing solution provided in the kit. Also, the washing step time is reduced using automated microtiter plate washer which is programmed to dispense a certain amount of wash solution into each wells and remove them. So after washing, conjugates are added. The conjugates are anti-human IgG antibodies with peroxidase conjugate. The anti-IgG is added and it will bind specifically to IgG antibodies that are bound to the solid phase. Again, the wells are washed to remove unbound substances. Later, substrate and stop solution are added the wells with VZV-IgG-Antibodies will produce yellow colour. The intensity of the colour is directly proportionalo to the amount of secondary antibody present in the well. And is determine by using automated ELISA microplate reader. After the absorbance of each well is being read, the result is printed out and is compared against cut-off values.

SOoooo heres the STEP BY STEP:
  1. Reagents and samples are brought to room temperature.
  2. 10 ul of Patients specimens are diluted in 1ml of dillution buffer. ( 100x dilution )
  3. 100ul of Positive and Negative Controls and diluted specimens are added into each wells.
  4. The plate is then incubated at room temperature for 30 minutes.
  5. During incubation, the wash solution is being prepared by diluting the concentrate into distilled water. ( 20x dilution)
  6. After incubation, the wells are washed using the microplate washer.
  7. 100 ul of Conjugate is then added into each wells except the blank well which act as a control.
  8. The plate is then incubated at room temperature for 30 minutes.
  9. After incubation, the wells are washed using the microplate washer.
  10. 100 ul of Substrate is added into each wells
  11. The plate is then incubated at room temperature for 15 minutes.
  12. 100 ul of stop solution is added to each wells to stop the reaction.
  13. The microplate is then place into the microtiter plate reader for results.

Results interpretation :

Quality control criteria -

  • Negative Control values should be less than 0.250
  • Positive Control values should be more than 0.750
  • +ve control / -ve control should be more than 5
  • Blank ( empty well ) should be less than 0.150

If either of the values do not meet the criteria, the whole run is rejected and rerun has to be conducted.

Interpretation -

  • Cutoff value (COV) = -ve control + 0.1 x +ve control
  • Positive > 1.15 x COV
  • Negative < 0.85 x COV

To interpret the results, calculations are carried out and these formulas are provided by the supplier of the kit.

Low positive will mean that the immunity is low and the patient is susceptible to re-infection

High/ mid positive will mean that the person is immune to the virus.

Negative will mean that is patient is not reactive or not immune to the virus.

So this is the end of my sharing, to summarise, mainly in virology lab, ELISA is one of the most common test that is conducted to detect viral infection as well as the immunity of the patient to specific virus.

****** THE END *******


Saturday, July 4, 2009

Tng Wess Lee, 0702570C
TG02, Grp 10
Allocation: Clinical Biochemistry Laboratory

There are a total of 3 rooms in my working environment. We are allocated to 10 machines to learn 1 machine each week before being transferred to another lab. For the first 2 weeks, the machines which i have handled are basically non-analytical but an organiser.

The first week, i was allocated to Laboratory Automated System. The workstation requires me to sort sample according to their priority. (1. Urgent/Stat, 2. Ward, 3. Routine) For the entire duration i only received blood and urine specimens. The specimens are sent via a telelift system called a pneumatic tube system/carrier system. Upon arrival, the specimens are punched with time and date, to prevent dispute between the wards/clinics and the lab.

After sorting these samples, clerks will collect the sorted samples and enter the appropriate data in the LIS and print specific barcode labels, which are pasted onto the tubes. They will then pass the tubes back to me to place it at the inlet.

The samples then run along a line, where it is then sent to be centrifuged to separate the blood cells from the serum. After being centrifuged, the sample enters the Serum Level Detector to determine the volume of serum and if there is sufficient serum to be tested. After that, the sample is brought by the line into the decapper to remove the caps.

The sample is then sent to the labeller to label another tube if a separate test is required to be conducted. If there is an extra tube which exits from the labeller, both the original tube and the newly labelled tube will enter the aliquoter. The aliquoter aliquots the serum from the original tube to the new labelled tube. If no aliquots need to be done, the original tube will pass through the aliquoter.

The specimen then enters the analyser. The LAS is a preanalytical stage whereby it prepares the sample for analysis. It compromises of the Inlet, the Centrifuge, the serum level detector, the decapper, the labeller and the aliquoter.

Monday, June 29, 2009

Week 1: Microbiology Dept

Name: Siti Hawa Bte Azali
Admin No.: 0704087F

During the 1st week of my attachment , i was assigned to work in the Microbiology Department where specimens are tested for presence of any pathogenic organisms and where identification of causative agents were carried out. This section is important as it aids in the final confirmation of clinical diagnosis.

Several tests were introduced to me by the section supervisor,some of which were familiar whereas others were not. Among the microbiological tests that i was assigned to practice on and eventually carry out are Gram and AFB Staining, Syphillis Test- VDRL and TPHA, PYR Enterococci test,Mycoplasma Test, etc.

Nature of specimens that this section usually test on are those such as serum (most common), sputum, stool, blood culture,bile, GI fluid and different types of aspirate taken during operation.

One of the test which i frequently did was the Widal Weil Felix Test - a test used to detect and measure levels of warm and cold agglutinins in blood.

Agglutinins are basically antibodies that causes haemagglutination to occur in the body. Cold agglutinins are active at low temperature (IgM) whereas warm agglutinins are active at warm temperatures (IgG).

This test is done on a patient's serum( in a plain tube) by testing it against 11 different reagents consisting of different commercial antigens (mainly different types of Salmonella).

Normal Values:
Warm agglutinins: no agglutination in titres at or below 1:80
Cold agglutinins: no agglutination in titres at or below 1:160

Procedure:
1) 20ul of serum is decanted onto each of 11 individual areas of test card
2) 1 drop of each reagent added to serum on respective test areas (reagent 1 into test circle 1, reagent 2 into test circle 2, etc)
3) Mix the serum and reagent on each circle
3) Rotate the test card for 1 min
4) Check for agglutination
Reagent-serum mixture with agglutination will then be tested again, this time with lower concentrations of serum (10ul and 5ul).
5) Check for agglutination for the 10ul and 5ul serum concentrations
6) Using a standard Widal Test reference table, we can calculate the titre of the agglutinins in the serum (eg. 1:40,1:80,1:160,1:320)

Abnormal values of cold and warm agglutinins may cause hemolytic anemia and therapeutic actions are then taken by the doctor.

High levels of Warm Agglutinins (~1:160,1:320) can be due to:
-Salmonella infections
-Lymphoma
-Systemic Lupus Erythomatosus

High levels of cold agglutinins (~ 1:320) can be due to:
-Mycoplasma and viral infections
-Multiple myeloma.

This test is not normally a routine test but is usually needed for urgent specimens.